For many people, CDNs are an obvious requirement for any public API or web service. However, I’ve come to realize that for the vast majority, they remain somewhat mysterious - or something they’re unaware of, even though they unknowingly use them daily.
So, here’s a very accessible, hands-on illustration of what a CDN does, using Fastly as an example.
What do CDNs do?
A CDN is a cloud service that can be added in front of existing web servers. Instead of connecting directly to the content servers, clients will connect to the proxy nodes operated by the CDN.
But why would you do this?
- First, it’s an easy way to improve security. CDNs have a massive amount of bandwidth and can seamlessly mitigate DDoS attacks.
- In addition to just passing traffic through, CDNs can store a copy of the content in their local cache. The next time a request for cached content comes in, the CDN can directly send the content to the client without having to hit the original content server at all. This can drastically reduce the load on that server.
- As a side effect, if the content server is temporarily down or overloaded, as long as the content is cached by the CDN, clients won’t even notice.
- CDNs typically implement recent protocols. If the content server doesn’t support HTTP/3, simply add a CDN in front of it, and you’re done – clients can now use that protocol without having to change anything on the content server.
- Okay, so far what we’ve described is a traditional reverse proxy. But CDNs have such proxies all over the world. This means that there will be multiple copies of the content, spread everywhere. No matter where the actual content source is, clients will download content from a node that’s close to their location, decreasing latency and improving reliability.
- Modern CDNs can do something else: execute code. The intent here is not to replace generic serverless functions but to be able to filter, transform, or aggregate content in real-time, without having to rewrite the original content server.
- For example, HTTP message signatures can be verified, or transparently computed before being delivered to clients.
- Also, they generally have APIs and UIs to get an overview of how your services are performing.
What’s pretty cool about Fastly
Here are a few things I like about Fastly:
- They offer a free tier, equivalent to around $50 per month, which is more than enough to explore how CDNs work and measure their impact on your services.
- They have a program to support open-source projects, which is great for the community.
- Cache entries can be flushed instantly. Additionally, they have a system to group resources into buckets, allowing you to flush everything in a bucket at once. This means that if necessary, content can be easily updated before it expires.
- One of the most appealing features of that CDN is its flexibility. You can enable it for individual host names without having to delegate your entire domain to them. There’s no need to change all your links to one of their domains either. Simply set a DNS entry for your own domain to point to one of their DNS names or IP addresses, and you’re good to go. This approach makes it very easy and safe to test a CDN without making significant changes to your existing setup. If things don’t go well, reverting is also easy: just delete or restore the DNS entries to their previous values, and you’re done. And what’s more, this even works with TLS. Not something they advertise, but this feature is, as far as I know, surprisingly unique to Fastly.
- They don’t store query logs by default, but if you need them, you can enable logging and have the data sent to a third-party service of your choice.
- Fastly also allows you to associate arbitrary WebAssembly modules with a service, which enables you to control how individual requests are handled. The environment provides APIs that allow you to inspect and modify queries and responses, manage the cache, and more. These APIs leverage the widely available WASI-Core ABI, which makes them accessible from any language that can compile to WebAssembly.
Fastly is a very powerful platform, and fortunately, there’s a wealth of documentation available. While this abundance of documentation is great, it can also feel overwhelming. Therefore, what follows are some simple steps to help you get started.
Terminology
- A service is an entity that responds to HTTP queries sent to a given virtual host name. If you want to put two completely different websites or APIs behind a CDN, you generally need to create two services. These services will have distinct rules, statistics, code, and can be enabled and disabled independently.
- A domain refers to a host name, as in “a DNS record name”. DNS folks will feel offended. But it means that if you own the domain
example.com, you can enable Fastly fortest.example.comonly by enteringtest.example.comwhenever a form field asks for a “domain”. This will work without affecting anything else in theexample.comzone. - A host, origin, or content server refers to the machine that the CDN proxies relay HTTP queries to and receive responses from.
- A backend or upstream server is an origin along with a set of parameters, such as whether TLS must be used to connect, timeouts, etc. A required parameter is the name of the backend, which must be unique for a given service.
- A subscription does not refer to a regular payment schedule. Instead, it’s a cron job that automatically updates TLS certificates.
Setting up a simple distributed cache
Go to https://fastly.com and create a free account.
Here’s what we’re going to do next: set up everything so that https://fastly.example.com acts as a caching layer for https://example.com. When people connect to https://fastly.example.com, they will see exactly the same content, but cached and protected by a CDN.
Services can be created in the CDN and Compute tabs:
- CDN: I’d recommend this when only basic HTTP caching is needed. It’s possible to run a bit of code, but using a DSL that has a lot of limitations compared to WebAssembly modules.
- Compute: This also does HTTP caching, but is far more flexible, as it allows requests to be handled by custom code compiled to WebAssembly.
To start with, we’re going to create a simple distributed cache, not running any custom code.
So in the “CDN” tab, click the “Create a CDN service” button.
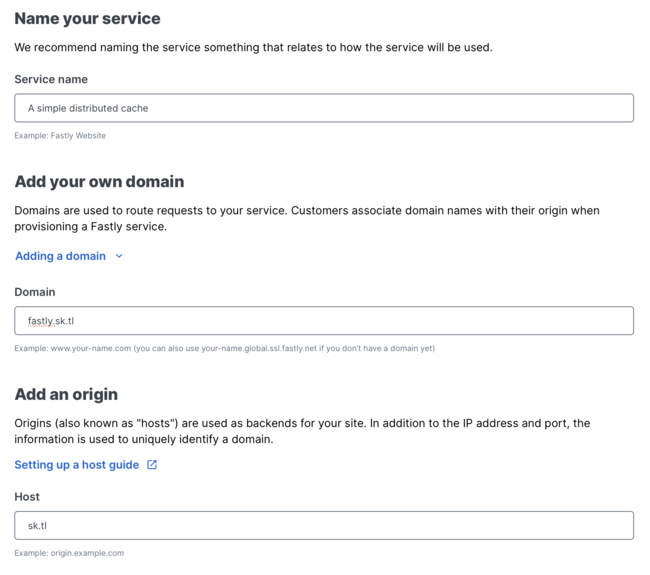
- Service name: This is a text description of the service. It can be anything; it’s just for UI purposes.
- Domain: Don’t be fooled: this is the host name you want clients to connect to instead of connecting directly to the origin. In this case, it should be
fastly.example.com. - Origin: This is where the CDN will relay
fastly.example.comtraffic to, i.e., the actual server hosting the content. We wantexample.comcontent to be served asfastly.example.com, so the origin should be set toexample.com. This is not a URI, just a host name or an IP address.
Note that the origin server doesn’t have to be configured for fastly.example.com. It should never see traffic for that virtual host name; only the CDN will.
By the way, I own the sk.tl domain but not example.com, and want to post actual screenshots of the procedure rather than a simulation. The screenshots say sk.tl instead of example.com. Either way, these are just examples, and you should use your own domain names or this is very unlikely to work.
Don’t click the “Test domain” button now; there’s more to be done.
Setting up TLS certificates
But wait, example.com already exists, and is served over TLS. We’d like fastly.example.com to be accessible over TLS as well, but since this is going to be handled on a completely different set of servers, how would that work?
Fortunately, Fastly makes that easy. No changes are required in the current example.com configuration, including the existing TLS certificates and how they are updated. The TLS configuration for fastly.example.com is going to be completely independent, and automatically managed by the CDN.
Click the Security tab, followed by the Manage certificates button and the Get started button:
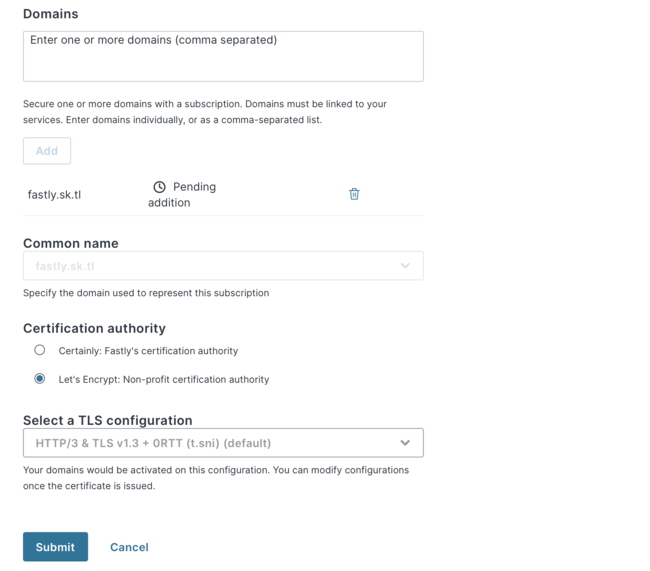
In the “domains” form, enter the host names to issue TLS certificates for. Not the domain name. Select “Let’s Encrypt” as the certification authority, “HTTP/3 + 0RTT” for the TLS configuration, and hit Submit.
A nasty warning may appear:
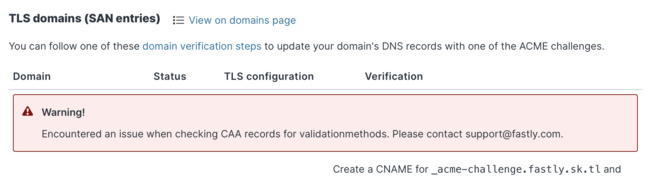
This is fine. Click verification options and unfold the ACME HTTP/CNAME challenge section:
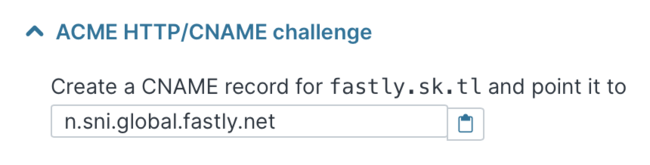
This is telling you how to set up the proper DNS record for the host name. In that case, I added the following entry to the zone:
fastly 3600 IN CNAME n.sni.global.fastly.net.
Once this is done, wait for authoritative DNS to get the entry, and reload the page. After a while, verification should pass:
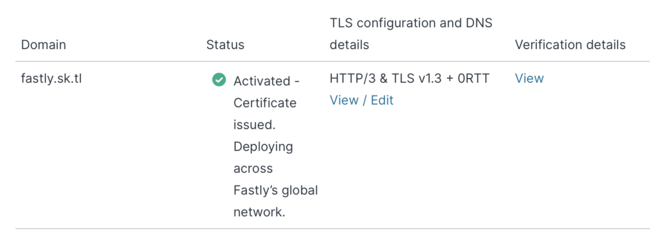
There’s nothing to change on the origin’s TLS configuration. Once again, certificates for the host name registered on the CDN are going to be independently managed. I don’t think using Let’s Encrypt on Fastly, and something else on the origin, is a problem either.
Testing the cached version of the website
Now, wait for a little while until the configuration has been propagated globally. Then, browse https://fastly.example.com and you should see the same content as the original website, except that everything feels faster (assuming the content is cacheable).
Configuration versions
If you go to the “CDN” tab again, the service is displayed:
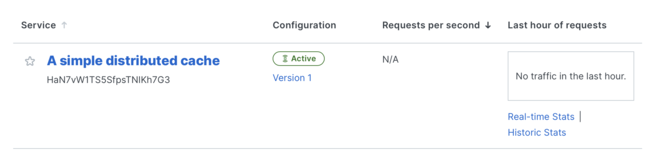
And can be clicked on:
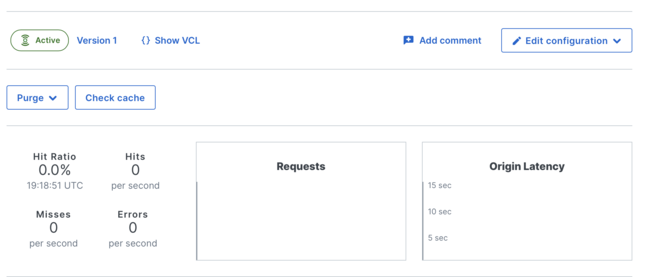
The stats will become more interesting once the service receives actual traffic.
The “Purge” button resets the cache or specific URIs. This is very useful during development.
But how do you edit the configuration? The “Edit configuration” button suggests cloning version 1 (active). What does that mean?
The idea is that at a given point in time, a specific version of the configuration is deployed. This includes all the parameters, code, and so on.
And once deployed, this version cannot be modified. Instead, it can be cloned. On that clone, any number of changes can be made, but they will only be deployed all at once, after the new version is activated to replace the previous one.
This is quite nice, because it’s also possible to revert to any previous version. So, if after having made a couple of changes, it turns out that something looks wrong, it’s possible to revert all the knobs to the previous working state, rather than having to find what exact knob introduced the issue.
And of course, any version can be cloned, not just the last one. It’s not exactly as powerful as Git, but this is still very useful, especially when making changes to production services.
Apex domains
In the previous example, we assigned fastly.example.com to the CDN by adding a CNAME DNS record.
However, if everything works well, we might eventually want example.com to be handled by Fastly, with some hostnames like origin.example.com being the origin.
Here’s the thing: example.com is a zone that contains other things, so it can’t be a CNAME record. This is a limitation of the DNS protocol itself.
Fortunately, instead of a CNAME record, we can also use IP addresses. Something I’ve only found in Fastly’s offering and deserves more attention.
Go back to the “Security” tab, click “Manage certificates”, then unfold the “View details” section on the right side of the box for the existing certificate.
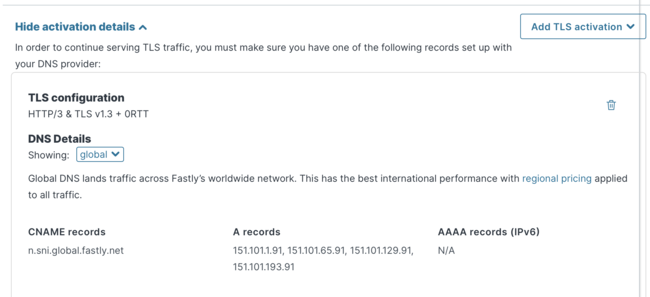
See the IP addresses at the bottom? Here’s the good news: these IP addresses don’t change. They are anycast addresses, so connecting to them will still reach servers close to clients.
So, as an alternative to CNAME records, regular A entries can be configured. And that works perfectly with apex domains such as, in our example, example.com.
Setting up a Fastly Compute service
In addition to caching, we can run arbitrary code whenever our service receives a request.
First, delete the existing service. Go to the “CDN” tab, click on the service name, and in the “Options” tab, choose “Deactivate”.
Follow the instructions, then open the “Options” tab again, and click “Delete”. Wait for a little while and reload the page: the service should be gone. The previously created TLS certificates are not deleted, though. There’s no need to recreate them.
Time to explore the “Compute” tab. Open it, followed by a click on the “Create service” button.
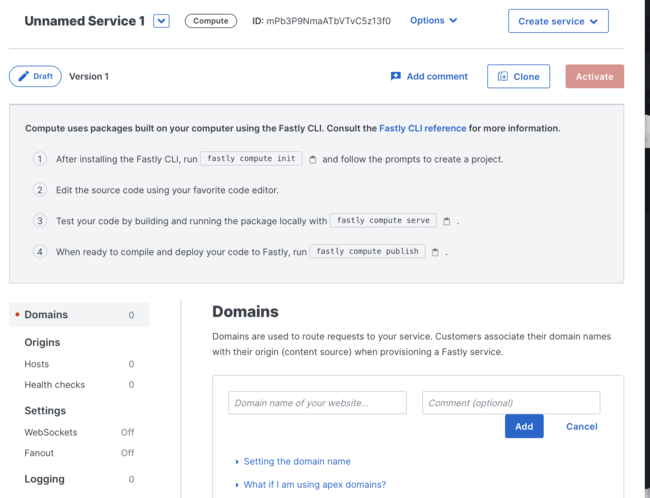
Before doing anything else, I’d recommend opening the “Options” menu and editing the service name.
Remember that “domains” are hostnames. So, enter the hostname that clients will connect to, for example fastly.example.com, in the “Domains” form.
Next, we need to register backends, i.e., how to connect to origin servers and retrieve the content. In the left pane, click the “Hosts” link:
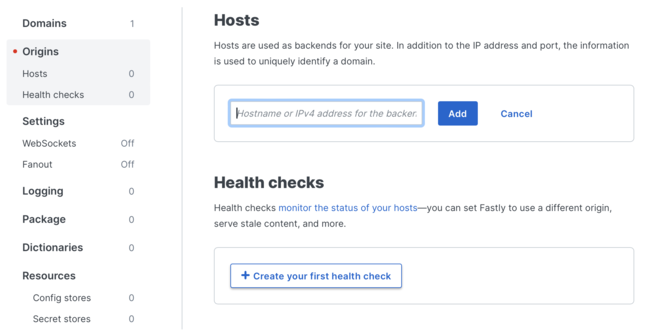
and add the hostname (not a URI) or IP address of the origin.
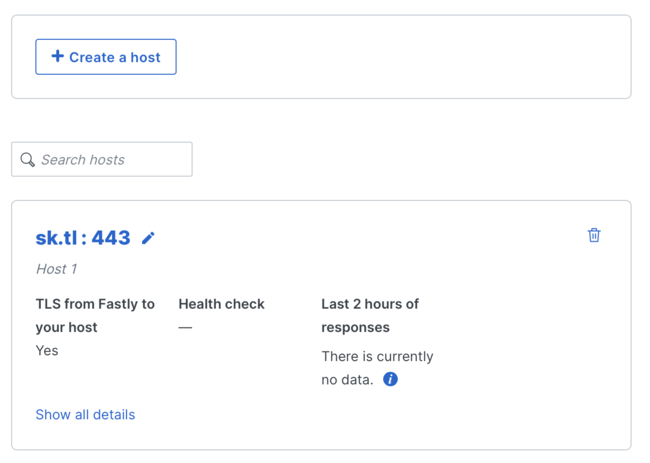
Remember that backends have several properties describing how to connect, but also a name. That name is how the backend will be referenced in the code, so it’s crucial to choose it wisely.
By default, we can see that it’s simply called “Host 1”, which is not ideal. So, click on the backend link to edit the properties and immediately change the name. It’s perfectly fine to set it to the same value as the hostname. Here, I’m just going to call it “origin”:
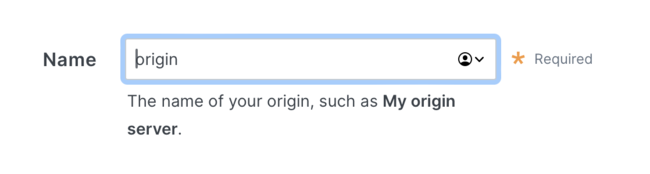
Scroll all the way down and click “Update”.
In a simple caching scenario, that would be enough. But here, a critical piece is missing: the WebAssembly application that will run and decide how to handle HTTP requests.
The Fastly command-line tool
While the API could be used directly, Fastly has an open-source command-line tool written in Go that can be downloaded here: Fastly command-line tool.
This tool is really handy for interacting with the CDN without the web UI, but also for deploying WebAssembly modules. So, we’re going to use it.
Deploying a WebAssembly module on Fastly
Fastly has a set of low-level APIs for interacting with the environment using WebAssembly. To use them in an idiomatic way, several high-level abstraction libraries exist, at least for Go, JavaScript, Rust, Swift, and Zig. Fastly themselves only maintain libraries for the first three, but they do not discourage third-party libraries for other languages.
The Compute service is billed according to bandwidth, CPU usage, and memory usage. Zig produces WebAssembly code that is generally faster and more memory-efficient than the other options. Since the language allows for precise control over memory allocations, it can also guarantee that the limits of the subscription plan cannot be exceeded.
We will thus be using Zig to create our first WebAssembly module to run on Fastly’s servers.
The Zig library for Fastly Compute is called Zigly. The easiest way to start is to copy the Zigly example directory.
Of course, the Zig toolchain must have been installed, in addition to the fastly command-line tool described above.
We’re going to use the fastly command to set up a few things in the same directory:
fastly compute init
The command will report that the directory is not empty, which is fine. Please proceed.
For the name, we’ll just use package. This is not the name of the service. It can be anything, but it’s easier to use the same name everywhere, as build scripts can be reused. package simply matches the name of the WebAssembly file, as defined in the build.zig file.
When asked for the language, choose Other ('bring your own' Wasm binary). This creates a fastly.toml file that we can ignore for now.
Edit that file and set service_id to the string displayed below the service name in the “Compute” tab of the web interface. It looks like mPc3P9NZaATbVTwC5z53f4.
The source code in src/main.zig is very concise:
// The backend name (registered as a "host" for that service in the Fastly UI)
const backend_name = "backend";
// The hostname to use in the Host header when making requests to the backend
// It can be set to `null` to use the original Host header
const host_header = "example.com";

// Proxy all incoming requests to the backend, with transparent caching.
pub fn main() !void {
    var downstream = try zigly.downstream();
    try downstream.proxy(backend_name, host_header);
}
downstream represents a connection from the client to the CDN, and upstream represents a connection from the CDN to some other server, such as the origin.
In this example, we tell the CDN to proxy everything from the client to a backend, changing the Host: header along the way.
backend_name should be set to the name of the backend we previously registered in the web UI (i.e., origin). And host_header should be set to what the origin expects (for example, example.com).
Let’s compile this to WebAssembly:
zig build -Doptimize=ReleaseSmall
The resulting Fastly Compute WebAssembly module can be found in zig-out/bin/package.wasm:
$ ls -l zig-out/bin/package.wasm
-rwxr--r--  1 j  wheel  2867 May  6 22:47 zig-out/bin/package.wasm
For reference, the empty Rust template (which doesn’t proxy anything, just returns an empty response) weighs 5.2 MB.
The next step is to create an archive, suitable for being uploaded to the CDN:
fastly compute pack -w zig-out/bin/package.wasm
And finally, we can deploy it:
fastly compute deploy
After deployment, wait for a little while. It takes a couple of seconds to deploy the application globally.
Then, browse to the address of the service, and you should receive the content from the origin. The fastly compute serve --file zig-out/bin/*.wasm command can be used for local testing.
Note that if you get a 500 Internal Server Error response while using the above example, it may be that the backend_name constant was not properly set.
Congratulations! You have just deployed a WebAssembly application globally.
The example code above may seem like it’s not doing much, but remember that this is not just a module running on a WebAssembly runtime, but rather middleware in a CDN pipeline. As a result, even without any additional code, the content is automatically cached. Of course, it’s also possible to reject connections, send static content or dynamically generated content, and more.
If a cacheable resource is accessed multiple times, the origin will only be hit the first time. Then, it will be directly served from the cache.
Caching also applies to queries made by the WebAssembly application itself.
CDNs are simple and useful
CDNs can feel obscure and intimidating. However, they are actually quite simple to use and can quickly improve the security and efficiency of a web service without requiring significant changes. With the ability to run arbitrary code, modern CDNs can also support any custom logic you may have, no matter how complex.
I know what you’re thinking. Why isn’t this website (and most of my websites and services) using a CDN, then?
If a service receives little to no traffic, such as this blog, let’s be honest: a CDN is not going to make a significant difference.
But there’s another reason: I manage my own DNS servers and I don’t want to delegate my domains to a CDN. Services like resolver.dnscrypt.info run a custom DNS server, so that wouldn’t work. The same applies to TLS certificates. I want to maintain control over most of them the way I want (for example, so that DoH hashes don’t change). I also don’t want to alter any of the URIs of my services, as unfortunately required by many CDNs. My dream was to be able to enable CDN proxying only for cherry-picked services, without touching anything else. And I only recently realized that it was possible using Fastly. Now you know, too.